Hello SNAP! readers! Are you ready for another fun WordPress tutorial? Today I’m going to show you how to create a navigation bar using WordPress menus and how to set up dropdowns for that navigation bar.
On the left side of your dashboard hover over “Appearance” and choose the “Menus” option. Your screen will now look something like this:
Enter a name for your navigation bar in that box and click “Create Menu.” Once you do this the left side options will become active. You use these options to create each individual navigation link.
You can add custom links linking to external sites or I often use this one for the “Home” link in my navigation bars. Just enter the url and what you want the link to actually say and click “Add to Menu.”
You’ll see the link added to your menu on the right side like this:
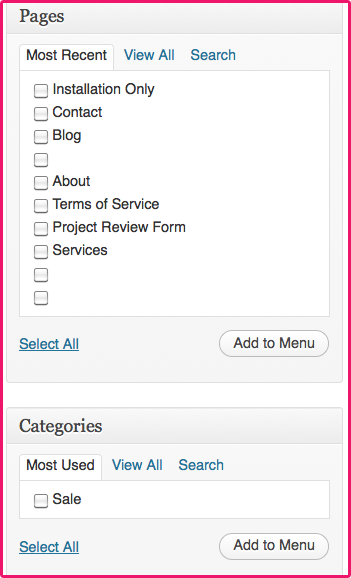
You can also add Pages you’ve created or a Category link.
There are some other options that might not show up. To make those active click the little “Screen Options” tab at the top of your screen.

It will pull down some other options you can check to include.
Once you have all your links added to your menu you want to click “Save Menu” and your navigation bar is completed! Applying that navigation bar to your site will vary depending on your theme.
If you are using the popular Genesis themes you will need to choose the menu you just created in the Theme Locations section from the Primary Navigation bar drop down at the top left side of the menu screen.
Click “Save” and you are all set!!
So now…say I want to make my “Advertise” link in the example below to be a drop down of the “About” tab. All I have to do is click on “Advertise” and you’ll see a dashed grey box appear.
Now, still clicked and holding that link box, move over to the right until that dashed grey box moves and looks like this:
Its that easy! Theoretically you could keep doing this to have sub links of sub links but don’t get too crazy! 🙂
And thats it! I love WordPress menus. They are so easy and really intuitive. Please let me know if you have any questions in the comments below and if you need help styling your navigation bars head over to my website and fill out a Project Review form for a quote.
Thanks!


Thank you so much for sharing! Now I need to know how to delete a nave bar link and/or category? I had one created that I’m not using and want to reorder everything a bit. Thanks!
Hi Christy! Thanks for your question. I should have included how to delete a link. So when you are in the dashboard in the menu edit area you’ll see a little arrow to the right of each link you’ve added, if you click that it will expand and there should be a link that says “Remove”…click that and it should delete it for you. Let me know if that doesn’t work for you…thanks!