
I owe each and every one of you a SUPER HUGE THANK YOU for pinning the simple cupcake to go container I shared last week. I had no idea this little solution would be SO very popular!

It’s time to share the tutorial for the project that won last week’s birthday challenge, Lynda’s awesome first birthday high chair.

This is Lynda’s second win. She also won our audition round with her kid’s back-to-school station.

First Birthday Highchair
So honored to have earned the first place spot for the birthday round. Thank you so much for all of you that voted. It was a really fun week for me.
For those of you that don’t know me well, I was a creative misfit for 99% of my life. About three years ago I was fortunate enough to tap into the creative side of my brain and I have been creating ever since. It is truly my passion.
One thing that makes me sad is that my grandmother who lived till she was 94 years old was an avid crafter and I never REALLY knew this until she passed away. I inherited a lot of her crafting supplies and it made me wish that I hadn’t found my own creative side earlier. I imagine crafting with her while she was alive and the even stronger bond we could have made. I have a few of her crafts that sit by my crafting table, so I feel she is still with me. This project was created in the spirit of grandma.
The one big thing I inherited from her was this 70-year-old high chair. My dad actually sat in this high chair as a baby.
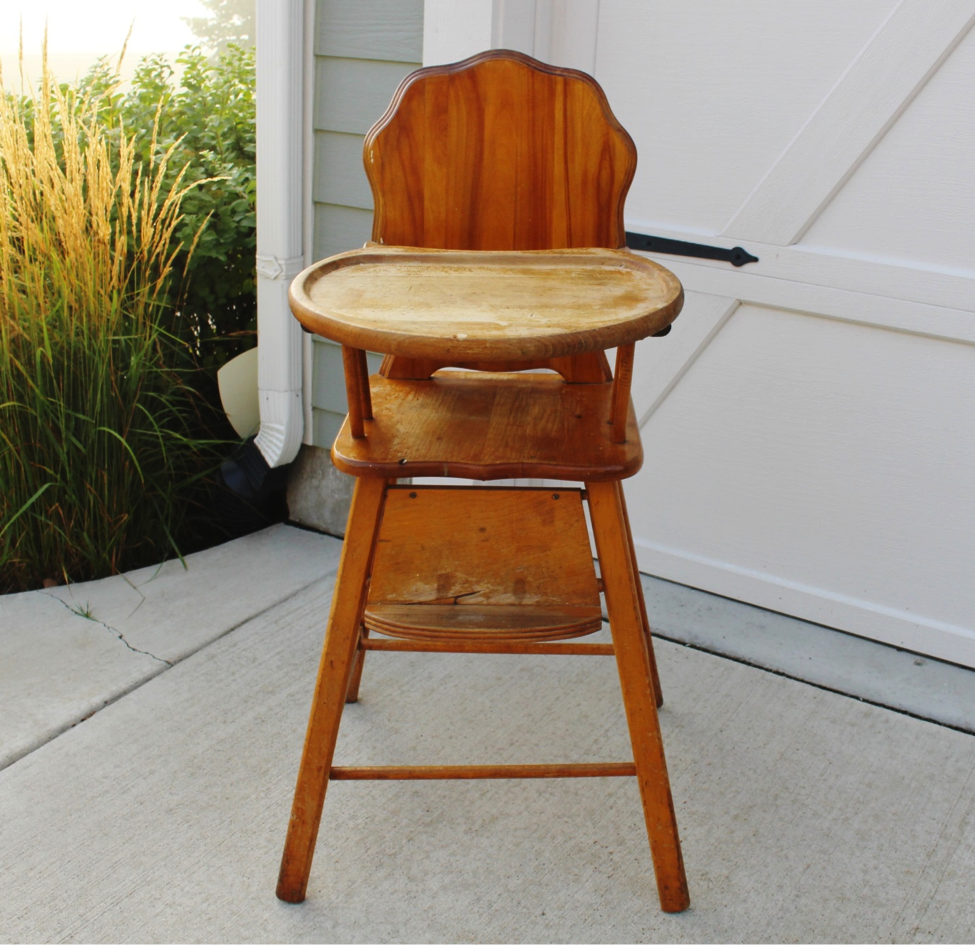
So I decided to make it pretty.
One of my friends just had a baby girl and I thought, how cute would this high chair be as a prop for first birthday pictures?! I knew I wanted it to be for a little girl since I have three girls, so all I needed was to decide which color to use. My current color obsession is aqua and I love the way hot pink looks with aqua, so…
I love Krylon’s Blue Ocean Breeze spray paint so I went to Home Depot and had them color match the cap of the spray paint in a can of sample-sized Behr. (When I am doing a small project like this I like to use a small color sample so I don’t waste a lot of paint and of course it is much cheaper!)
I added Webster’s Chalk Paint Powder to the Behr sample to make it chalk paint. Since I turned the paint into chalk paint I didn’t have to prime the chair first which is nice.

After the chair was painted, I added hot pink polka dots. I intended to paint them on but ran out of time so I cut one inch circles out with my Silhouette Cameo and used double sided tape to stick them on. Eventually I will paint them on.
To finish off the paint job I measured 4 and ½ inches from the bottom of the feet and painted them a hot pink color using glossy acrylic paint. I blended a few of the pink colors together to get the pink I was looking for.
The next step was the tutu. I bought some fabrics in coordinating colors. Hot pink and aqua were a given but when I design things, I always pick one more color to “splash†in so this time I chose yellow. (Ignore the buttons in the picture, I never used them.)

I tore strips of fabric about one inch wide by the length of the fabric (I bought one yard of fabric for each fabric choice). If you cut the beginning of the fabric you can then tear the entire strip. In my opinion it looks better more frayed than a straight cut. I then tied the fabric strip to the ribbon I used for the tutu “belt.â€
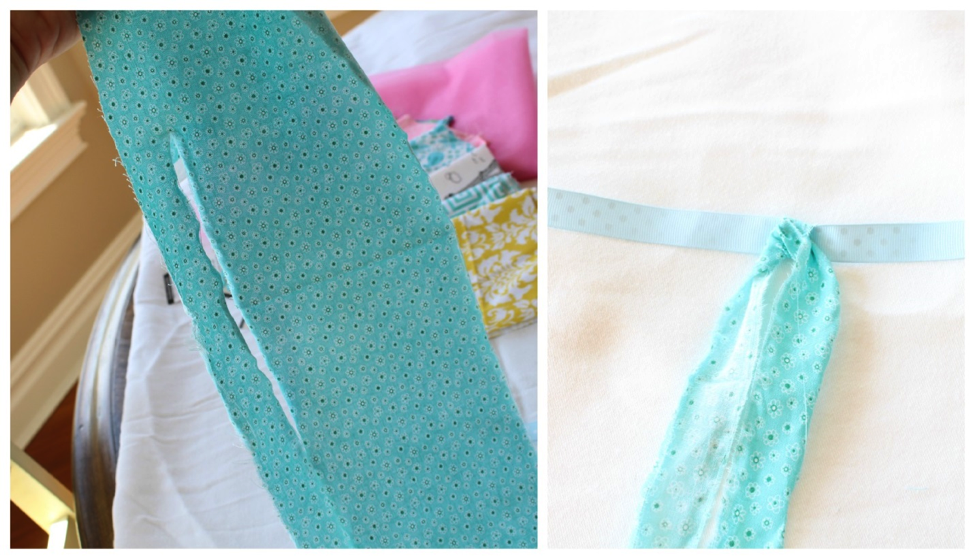
I did the same thing with the tulle but cut the pieces about 18 inches wide and about 42 inches long. Once the entire tutu was done I cut it to the length I wanted, then I nailed the tutu to the wood tray.

I also made the 1st B-Day Princess Flag Bunting in the pictures – I cut out the triangles from some cute scrapbook paper, then made some letters with my silhouette cameo and glued them on to the paper, then punched some holes in each side of the triangle paper and ran a ribbon through it.

That is it!! It was a really fun project and I sure hope that my grandma is smiling down and not totally pissed that I painted her highchair!

 What a great piece for a first birthday party!
Got a minute? Pop over to Lynda’s site and check out her little girl’s bedroom makeover. It’s to die for!!!

I’ve been wondering why you favor chalkboard paint. Is it just so you can skip the priming? Do you plan to write messages on the chair? Is there some other advantage?
It sure is a cute project!
How does the painted surface clean up? Is it safe to be eaten off of, or is it more of a decorative piece?