
I am seriously blown away by the talent this season. Every week there are several tutorials that I am interested in seeing and I’d have a hard time selecting my favorite…It makes it kind of nice to know that you get to pick more than one “favorite” up until nearly the end.

This week, I am excited to share Crystal’s fantastic reversible fall leaves pillowcase tutorial.
 Crystal’s projects have always ranked high, but you’ll probably remember her for week one win and chalkboard serving tray tutorial.

In any event, she’s back with another great tutorial for her week four win!
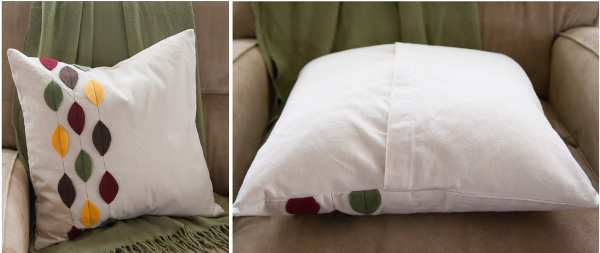
Reversible Fall Leaves Pillowcase Tutorial
I am so excited to be here sharing the tutorial for my reversible fall leaves pillow with you! I have to admit, I was a bit shocked when I opened the email from Tauni informing me I had won. Every project in the fall décor line up was so great, I feel really honored you chose mine!

I have seen reversible pillows before, but they always have one design on the front and one on the back. I wanted this reversible pillow to have the second design hiding on the inside. That way if the pillow falls off my couch or somehow gets flipped over, I don’t end up with a Christmas pillow in September.

This same concept could be used to create a pillow for any holiday. Or you could even just pick two different fabrics. Then when you get tired of one look, flip to the other.

To make this pillow, I used an off white home décor fabric and some craft felt to make the leaves and holly. You can choose any fabric for the front; I recommend something with a bit of weight so it holds up better. The envelope closure on the back is the same for both sides so if you choose two different fabrics for the front, make sure you choose something that coordinates with both for the back. The fabric for the back also needs to be one without a right or wrong side, meaning both sides of the fabrics look the same. Solid home décor fabrics are a good choice for the back.
The first step is to determine the size your case needs to be. I had a pillow from Ikea for my insert, the tag says 20†x 20†but when I measured from seam to seam it was really more like 19â€. So I ended up making my case for a 19†x 19†pillow.
Cut 2 squares of fabric that are 1†bigger than your pillow and 2 rectangles for the back that are 1†bigger than the pillow in length and half that plus 3†in width. For a 19†x 19†pillow I used two 20†squares and two rectangles that are 20†x 13â€

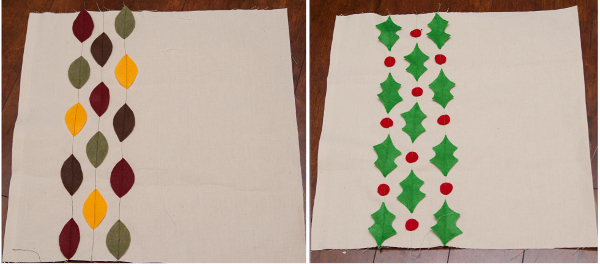
Cut your leaves from felt. I first sketched a leaf on paper to use as a template when cutting. My leaves are about 1.5†wide and 2.5†long. To cut the holly berries, I traced a nickel on a piece of paper you use as a template. Pin your leaves in three rows on one of the pillow fronts, and then sew them on with a contrasting thread.

Repeat with the holly leaves on the other pillow front.
Finish one long edge of the rectangle by folding the edge over ¼â€ and then another 1†and topstitching along the folded edge.

Lay your fall leaves front face up and place one of the rectangles on top with the folded edge up. Line up the three unfinished sides with the edge of the pillow front. Lay the other rectangle on the other side with the folded side down. Line up the raw edges with the edge of the pillow front, the finished edges of the rectangles will overlap in the middle. Pin around the edges and baste stitch all the way around the pillow ½â€ from the edge.

Lay the Christmas side of the pillow case face down on top of the pillow backs. You should have the fall leaves on the bottom, the Christmas leaves on top, and the back pieces sandwiched in the middle. Pin around the edges and sew with ½â€ seam allowance leaving a 3†opening. Make sure the opening is not right where the leaves are. Clip the corners close to the seam to reduce the bulk. Turn the pillow through the hole you left open. Fold the raw edge in and hand stitch the opening closed.

Your pillow is done! You should have fall leaves on one side and holly leaves on the other. Thanks again for voting for my fall leaves pillow!

Thanks for sharing your awesome project Crystal!
P.S. If you’ve got a little boy, you can’t miss Crystal’s shark trick-or-treat bag. My boys think it’s “totally cool.”
